


QQ 官方机器人 简单开发
开端
闲来无事,在b站加了一个群,群里有个有意思的机器人
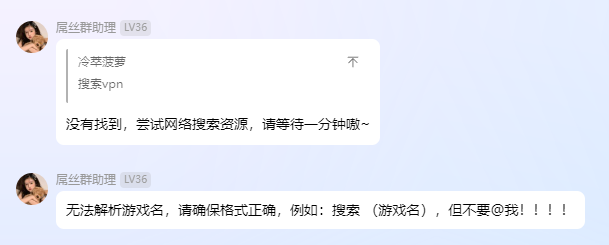

很有意思,在b站上搜索发现,springboot 是可以整合一些开源的框架完成这种操作,在使用后发现,目前的qq机器人框架都已经停止维护,登录协议已经无法使用,而且qq封禁力度大,很多机器人账号活不过几天,风险太大,就在准备放弃时,竟然发现!!!
转折
qq开放平台在2024年5月份将qq官方机器人开放给个人使用,这简直让人太兴奋了,马不停蹄注册并开始使用
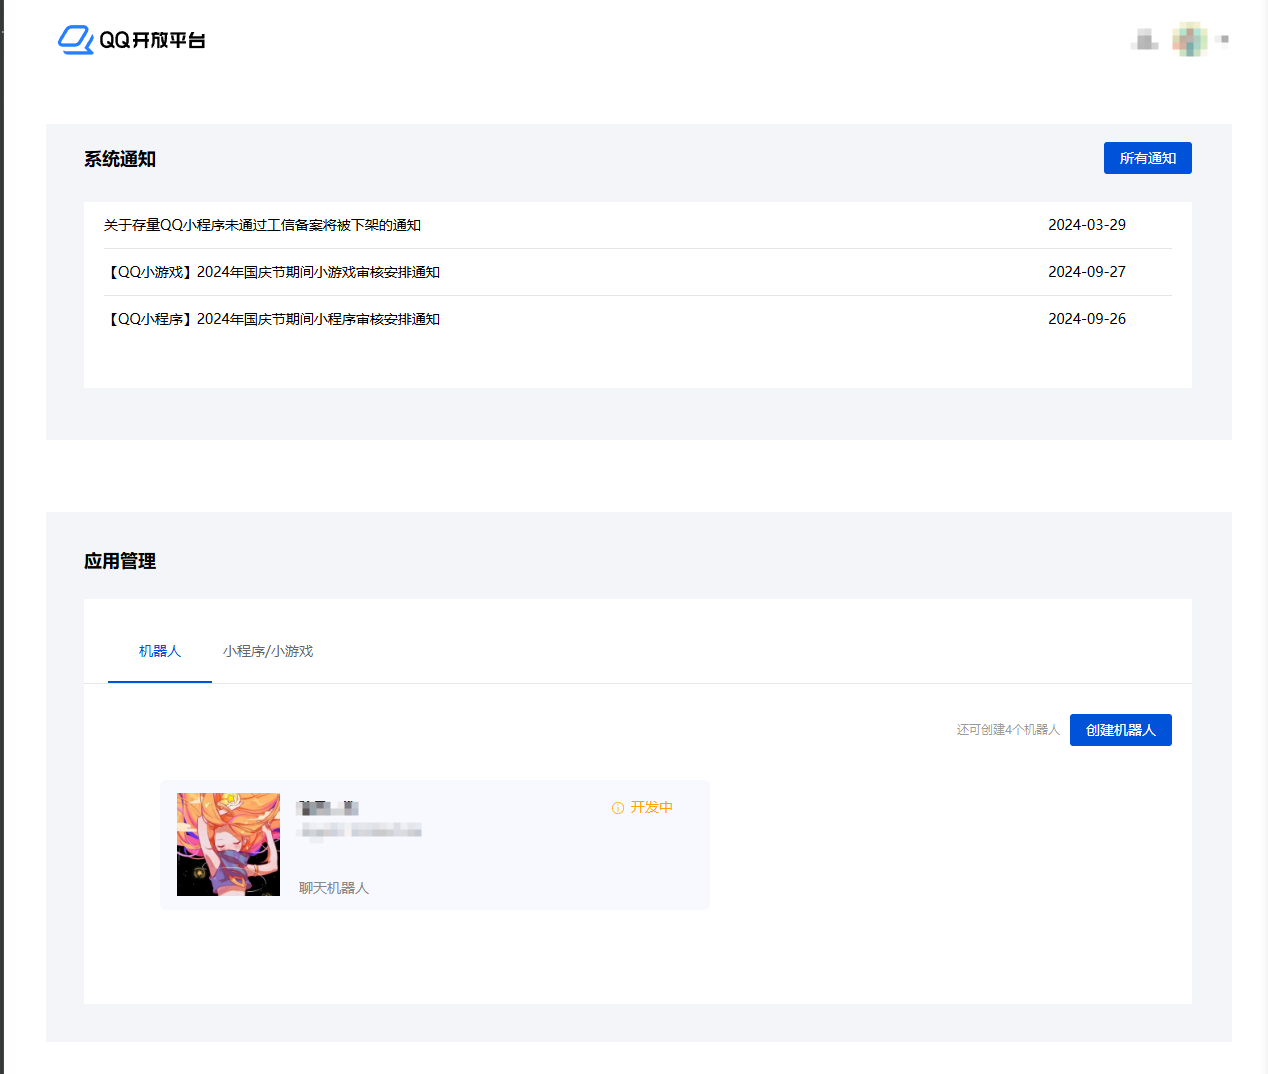
在这里,我们可以创建机器人,填写一些奇奇怪怪不重要的信息就可以开始进行开发了
准备工作
首页
无服务器
在我们没有服务器的情况下,我们可以通过配置沙箱进行开发,里面有很多现成的插件供我们使用和配置,这里不再过多赘述,具体设置可以看 这个链接
有服务器
作为一个拥有自己服务器的高端人士(用的最便宜最垃圾的服务器),我们当然要自己去开发有意思的功能,怎么能用别人的呢,我们开发的功能只是自己使用,并不会发布这个机器人(主要是ai太贵,发布出去用的人多了,钱包hold不住,自己玩玩拉倒)
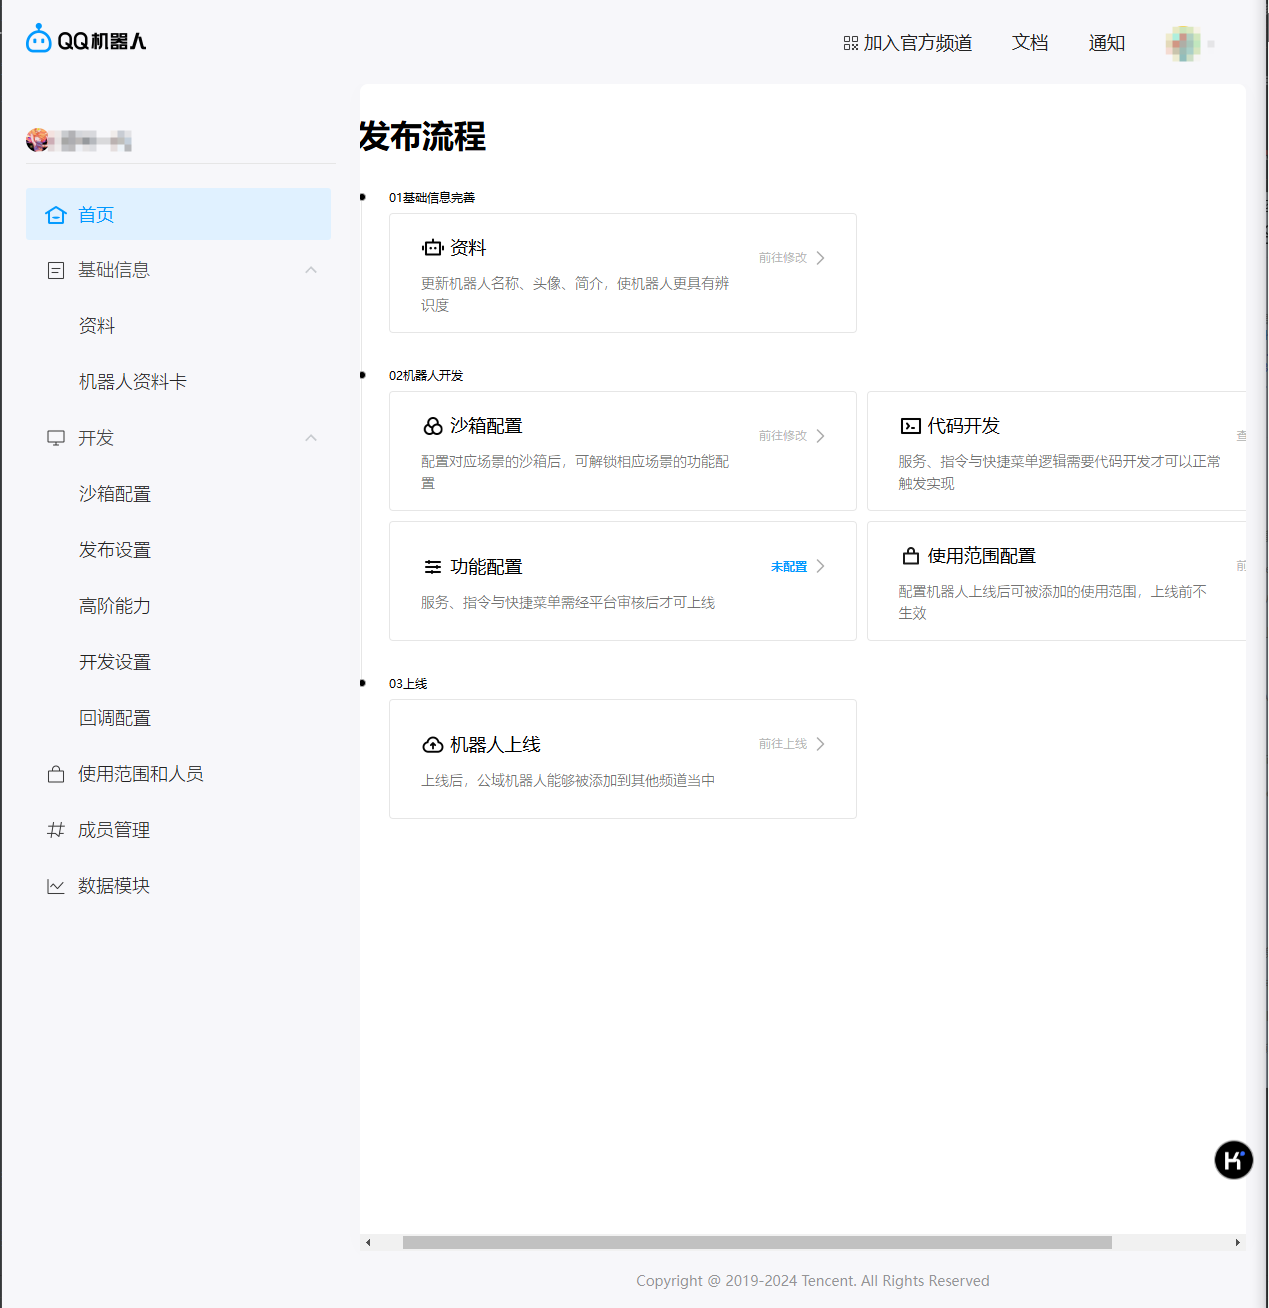
沙箱配置
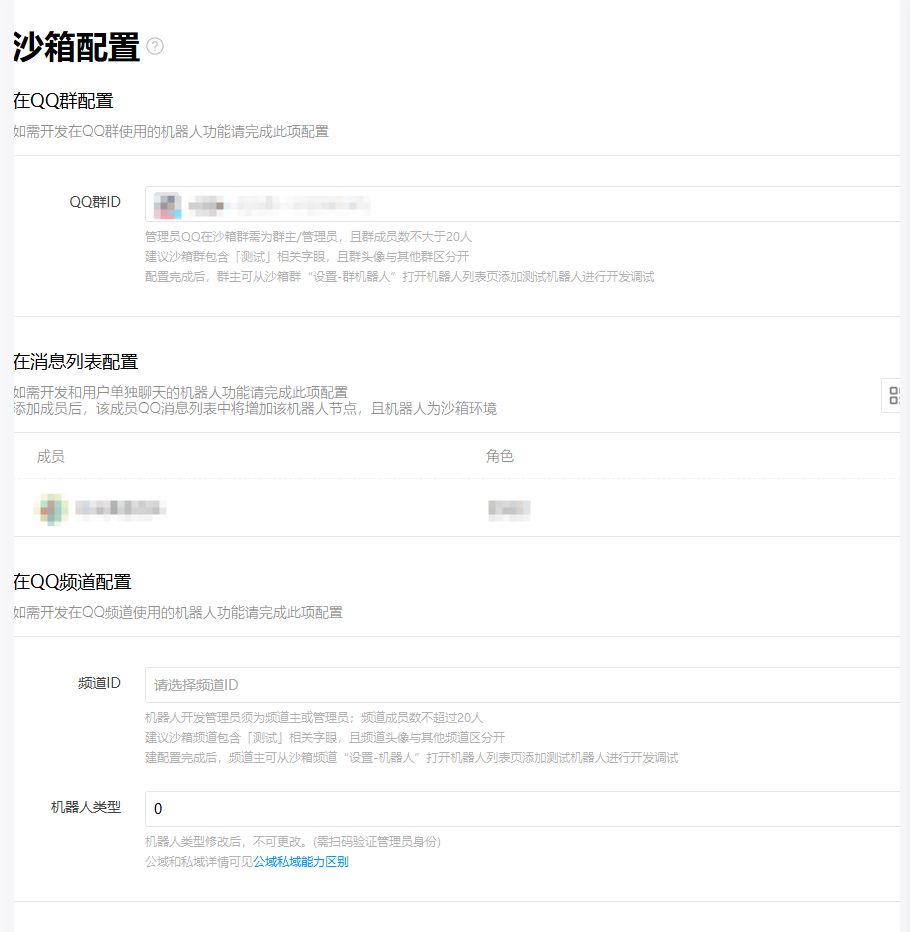
在沙箱配置中,指定机器人生效的群聊,群聊只能选择一个(在具体的使用过程中发现,先指定一个群聊,在群聊中把机器人加入群聊,然后再重新指定群聊,先前加入机器人的群聊机器人不会消失,卡个bug可以让很多群都能使用这个机器人哦)
开发设置
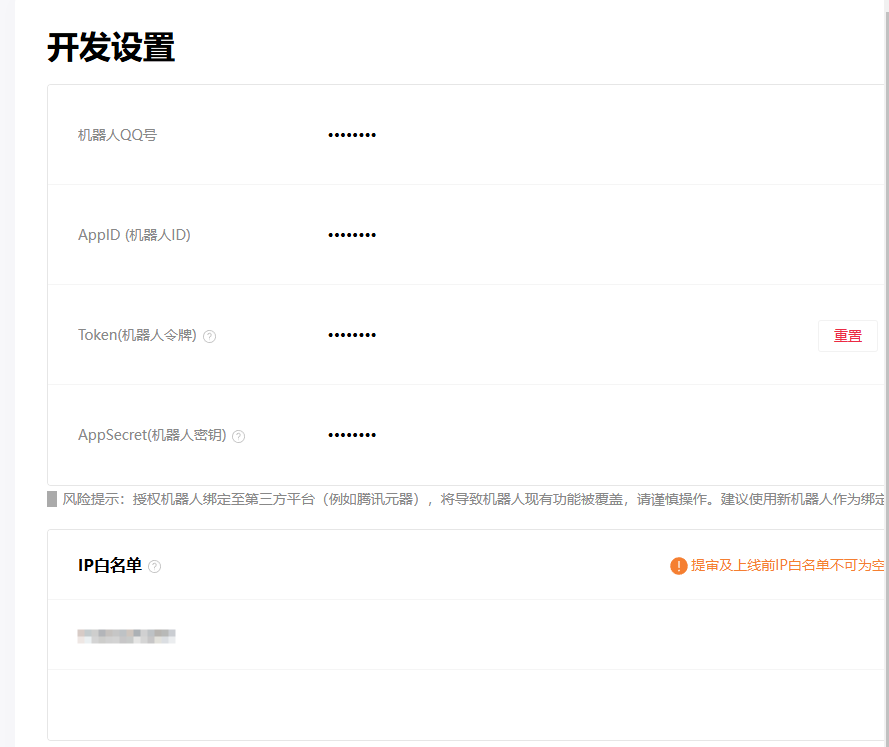
我们在这里重置token并记录token值
配置我们服务器的 IP 地址
回调配置等暂时没有用到,回头再说,先把机器人搭起来
正式开发
我们使用 QQ 机器人的 Python sdk
pip install qq-botpy
注意 python 版本要在 3.8 以上哦
预览整个结构
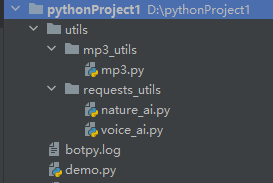
超级简单
整合的功能
KIMI 的大模型能力
先去看看 kimi 的 api 文档
curl https://api.moonshot.cn/v1/chat/completions \
    -H "Content-Type: application/json" \
    -H "Authorization: Bearer $MOONSHOT_API_KEY" \
    -d '{
        "model": "moonshot-v1-8k",
        "messages": [
            {"role": "system", "content": "你是 Kimi,由 Moonshot AI 提供的人工智能助手,你更擅长中文和英文的对话。你会为用户提供安全,有帮助,准确的回答。同时,你会拒绝一切涉及恐怖主义,种族歧视,黄色暴力等问题的回答。Moonshot AI 为专有名词,不可翻译成其他语言。"},
            {"role": "user", "content": "你好,我叫李雷,1+1等于多少?"}
        ],
        "temperature": 0.3
   }'
简单封装一下(文件名:nature_ai.py)
import requests
from botpy import logging
import time
_log = logging.get_logger()

apiKey = '你自己的apiKey'

headers = {
    "ai":{
        'User-Agent': 'Apifox/1.0.0 (https://apifox.com)',
        'Content-Type': 'application/json',
        'Authorization': f'Bearer {apiKey}'
    }
}
urls = {
    "ai":"https://api.moonshot.cn/v1/chat/completions"
}

def post_to_ai(context):
    header = headers.get('ai')
    data = {
        "model": "moonshot-v1-8k",
        "messages": [
            {"role": "user", "content": context}
        ]
    }
    base_url = urls.get('ai')
    replay = requests.post(base_url, headers=header, json=data).json()
    return replay
睿声 AI 的 mp3 生成功能
这个 AI 可厉害了,能输出雷军语音呢(笑)
看看睿声 AI 的 api 文档
由于资金问题,我挑选了这两条(好多不给用,呜呜呜~~~~)


看看 curl
curl --location --request POST 'https://v1.reecho.cn/api/tts/generate' \
--header 'User-Agent: Apifox/1.0.0 (https://apifox.com)' \
--header 'Content-Type: application/json' \
--header 'Authorization: Bearer ????????' \
--data-raw '{
  "contents": [
    {
      "voiceId": "雷军id",
      "text": "大家好,我是雷军"
    }
  ]
}'
curl --location --request GET 'https://v1.reecho.cn/api/tts/generate/?limit&offset&status&stream' \
--header 'User-Agent: Apifox/1.0.0 (https://apifox.com)' \
--header 'Authorization: Bearer ????????'
voiceId 是自己添加的语音模型,可在自己的控制台复制
?写自己的 API KEY
看看响应
{
    "status": 403,
    "message": "Insufficient Credit, Please recharge first. 余额不足,请前往增值商店充值."
}
额。。。
重新来
{
    "status": 200,
    "message": "OK",
    "data": {
        "id": "fe8eccdc-41d7-4c5e-a45f-f6744ba59699",
        "userId": "f84e43a0-9ec0-4ff6-942f-354024350246",
        "status": "pending",
        "type": "reecho-neural-voice-001",
        "metadata": {
......
......
好长,但是我们要的是这个 id
拿到id
请求一下 get
{
    "status": 200,
    "message": "OK",
    "data": {
        "id": "fe8eccdc-41d7-4c5e-a45f-f6744ba59699",
        "userId": "f84e43a0-9ec0-4ff6-942f-354024350246",
        "status": "generated",
        "type": "reecho-neural-voice-001",
        "metadata": {
            "contents": [
                {
                    "voiceId": "market:167b4212-c032-4f42-98fa-15293584aa51",
                    "text": "大家好,我是雷军",
                    "audio": "https://voc-public-storage.reecho.cn/generate/fe8eccdc-41d7-4c5e-a45f-f6744ba59699/fe8eccdc-41d7-4c5e-a45f-f6744ba59699-0-0yivct.mp3",
                    "duration": 2.5861,
                    "generatedAt": "2024-11-03T14:18:19.745Z"
                }
.....
.....
更长了,但是没关系,我们拿到了 MP3 地址
太好了,简单封装一下(voice_ai.py)
import requests
from botpy import logging
import time
_log = logging.get_logger()
voiceIdMap = {
    "lei/":"167b4212-c032-4f42-98fa-15293584aa51",
    "sun/":"69623557-9b41-46b0-96b6-7e38705d8074"
}

voiceApiKey = '????????'

headers = {
    "mp3":{
        'User-Agent': 'Mozilla/5.0 (Windows NT 10.0; Win64; x64) AppleWebKit/537.36 (KHTML, like Gecko) Chrome/91.0.4472.124 Safari/537.36',
        'Content-Type': 'application/json'
    },
    "voice_ai":{
        'User-Agent': 'Apifox/1.0.0 (https://apifox.com)',
        'Authorization': f'Bearer {voiceApiKey}',
        'Accept': '*/*',
        'Host': 'v1.reecho.cn',
        'Connection': 'keep-alive'
    }
}

urls = {
    "voice_ai_get_id":"https://v1.reecho.cn/api/tts/generate",
    "voice_ai_get_mp3_url":"https://v1.reecho.cn/api/tts/generate/"
}


def download_mp3(mp3_url) :
    header = headers.get('mp3')
    res = requests.get(mp3_url, stream=True, headers=header)
    while res.status_code != 200:
        res = requests.get(mp3_url, stream=True, headers=header)
        _log.info("重试")
    return res

def voice_ai_get_id(context, pre):
    base_url = urls.get('voice_ai_get_id')
    header = headers.get('voice_ai')
    data = {
        "contents": [
            {
                "voiceId": voiceIdMap.get(pre),
                "text": context
            }
        ]
    }
    id_info = requests.post(base_url, headers=header,json=data).json()
    return id_info


def voice_ai_get_mp3_url(id_info):
    _log.info(id_info)
    param_value = id_info.get('data').get('id')
    base_url = urls.get('voice_ai_get_mp3_url') + param_value
    header = headers.get('voice_ai')
    response = requests.get(base_url, headers=header).json()
    while response.get('data').get('status') != 'generated' :
        time.sleep(5)
        response = requests.get(base_url, headers=header).json()
    mp3_url = response.get('data').get('metadata').get('contents')[0].get('audio')
    return mp3_url
写博客的时候才发现,原来两个 url 是同一个,草率了,不过问题不大
这里有个细节,我们的 MP3 需要下载下来,因为 qq 支持的语音文件是 silk 格式,我们需要转码后再用 nginx 将资源暴露出去,获取新的 silk 的url
最后的运行文件
# -*- coding: utf-8 -*-
import os
import botpy
from botpy import logging
from botpy.message import C2CMessage, GroupMessage
import utils.requests_utils.voice_ai as v_utils
import utils.requests_utils.nature_ai as a_utils
import hashlib
import utils.mp3_utils.mp3 as mp3

host = 'http://服务器ip地址/'

_log = logging.get_logger()

rootHome = '/home/download/'


class MyClient(botpy.Client):

    async def on_ready(self):
        _log.info(f"robot 「{self.robot.name}」 on_ready!")

    async def on_c2c_message_create(self, message: C2CMessage):

        # 雷军语音
        if message.content.startswith(' #雷军语音 ') or message.content.startswith(' #孙狗语音 '):
            hash_object = hashlib.sha256(message.content[6:].encode())
            hash_hex = hash_object.hexdigest()
            pre = ''
            if message.content.startswith(' #雷军语音 '):
                pre = 'lei/'
            elif message.content.startswith(' #孙狗语音 '):
                pre = 'sun/'
            leiHome = rootHome + pre
            filename = leiHome + hash_hex
            if not os.path.exists(filename + '.mp3') :
                context = message.content[6:]
                if len(context) == 0:
                    await message._api.post_c2c_message(
                        openid=message.author.user_openid,
                        msg_type=0, msg_id=message.id,
                        content="请输入语音内容")
                    return
                # 异步执行任务,获取对应任务 id
                id_info = v_utils.voice_ai_get_id(context,pre)

                # 获取任务结束后的 MP3 地址
                mp3_url = v_utils.voice_ai_get_mp3_url(id_info)

                # 下载对应 MP3
                mp3.downloadMp3(mp3_url, filename)


            mp3.convert_to_silk(filename + '.mp3', leiHome)
            _log.info(leiHome)
            new_url = host + pre +  hash_hex + '.silk'
            _log.info(f'new url: {new_url}')
            uploadMedia = await message._api.post_c2c_file(
                openid=message.author.user_openid,
                file_type=3,  # 文件类型要对应上,具体支持的类型见方法说明
                url=new_url # 文件Url
            )
            _log.info('上传成功')
            await message._api.post_c2c_message(
                openid=message.author.user_openid,
                msg_type=7,  # 7表示富媒体类型
                msg_id=message.id,
                media=uploadMedia
            )


        # ai
        else:
            user_message = message.content

            replay = a_utils.post_to_ai(user_message)

            await message._api.post_c2c_message(
                openid=message.author.user_openid,
                msg_type=0, msg_id=message.id,
                content=f"{replay.get('choices')[0].get('message').get('content')}"
        )

    async def on_group_at_message_create(self, message: GroupMessage):

        # ai
        if message.content.startswith(' #雷军语音 ') or message.content.startswith(' #孙狗语音 '):
            _log.info("进来了")
            hash_object = hashlib.sha256(message.content[6:].encode())
            hash_hex = hash_object.hexdigest()
            pre = ''
            if message.content.startswith(' #雷军语音 '):
                pre = 'lei/'
            elif message.content.startswith(' #孙狗语音 '):
                pre = 'sun/'
            leiHome = rootHome + pre
            filename = leiHome + hash_hex
            if not os.path.exists(filename + '.mp3'):
                context = message.content[6:]
                if len(context) == 0:
                    await message._api.post_c2c_message(
                        openid=message.author.user_openid,
                        msg_type=0, msg_id=message.id,
                        content="请输入语音内容")
                    return
                # 异步执行任务,获取对应任务 id
                id_info = v_utils.voice_ai_get_id(context, pre)

                # 获取任务结束后的 MP3 地址
                mp3_url = v_utils.voice_ai_get_mp3_url(id_info)

                # 下载对应 MP3
                mp3.downloadMp3(mp3_url, filename)

            mp3.convert_to_silk(filename + '.mp3', leiHome)
            new_url = host + pre + hash_hex + '.silk'
            _log.info(f'new url: {new_url}')
            uploadMedia = await  message._api.post_group_file(
                group_openid=message.group_openid,
                file_type=3,  # 文件类型要对应上,具体支持的类型见方法说明
                url=new_url  # 文件Url
            )
            _log.info('上传成功')
            await message._api.post_group_message(
                group_openid=message.group_openid,
                msg_type=7,  # 7表示富媒体类型
                msg_id=message.id,
                media=uploadMedia
            )

        else:
            user_message = message.content

            replay = a_utils.post_to_ai(user_message)

            messageResult = await message._api.post_group_message(
            group_openid=message.group_openid,
            msg_type=0,
            msg_id=message.id,
            content=f"{replay.get('choices')[0].get('message').get('content')}")
            _log.info(messageResult)


if __name__ == "__main__":
    # 通过预设置的类型,设置需要监听的事件通道
    # intents = botpy.Intents.none()
    # intents.public_messages=True

    # 通过kwargs,设置需要监听的事件通道
    intents = botpy.Intents(public_messages=True)
    client = MyClient(intents=intents)
    client.run(appid='????', secret='????')
最后的 appid 和 secret 都是机器人的参数,我们一开始拿到的那几个
这里的具体内容不再介绍,都是 QQ 机器人 的 SDK
文件类型啥的都可以在方法中找到注释
贴上 github 地址:https://github.com/tencent-connect/botpy
到此为止,我们实现了雷军语音的生成和 AI 问答的qq机器人,实在是太厉害了吧^_^
展示
